Greetings! I'm Aneesh Sreedharan, CEO of 2Hats Logic Solutions. At 2Hats Logic Solutions, we are dedicated to providing technical expertise and resolving your concerns in the world of technology. Our blog page serves as a resource where we share insights and experiences, offering valuable perspectives on your queries.
Shopware does not permit the display of every component on the plugin configuration page due to its complexities. Instead, Shopware recommends creating custom modules to effectively showcase these components within plugins. While creating our custom modules is an option, it’s essential to note that this approach can be time-consuming. As an alternative, we can opt to utilize custom components within the plugin configuration to meet our plugin’s specific requirements more efficiently. In this blog post, we will dive deep into a detailed guide on how to elegantly display messages and implement API calling buttons in the plugin configuration by utilizing custom components.
Good looking messages
In our plugins, we frequently utilize snippets to incorporate translations into text elements. To present these snippets in an appealing and informative manner within the plugin, we can use custom components. First, we need to add a custom component to the plugin’s config page, like below.
| 1 2 3 4 5 6 7 | <card> <title>Info</title> <title lang="de-DE">Info</title> <component name="snippet-info"> <name>snippetInfo</name> </component> </card> |
The Next step is to import the component into the administration. Import the component in the main.js file in the src/Resources/app/administration/src/ folder.
| 1 | import './component/snippet-info' |
In the snippet-info/index.js file add the below mentioned code.
| 1 2 3 4 5 6 7 8 9 10 11 12 13 14 15 16 17 18 19 20 21 22 23 24 25 26 27 28 29 30 31 32 33 34 35 36 37 | const { Component, Context } = Shopware; import template from './snippet-info.html.twig'; import './snippet-info.scss'; import deDE from './snippet/de-DE.json'; import enGB from './snippet/en-GB.json'; Component.register('snippet-info', { Template, methods: { goToSnippetManager() { const adminPath = Context.api.uri; const emailTemplatePath = `${adminPath}#/sw/settings/snippet/detail/general.message`; window.open(emailTemplatePath, '_blank'); } }, { 'de-DE': deDE, 'en-GB': enGB }, }<span id="mce_marker" data-mce-type="bookmark" data-mce-fragment="1"></span> |
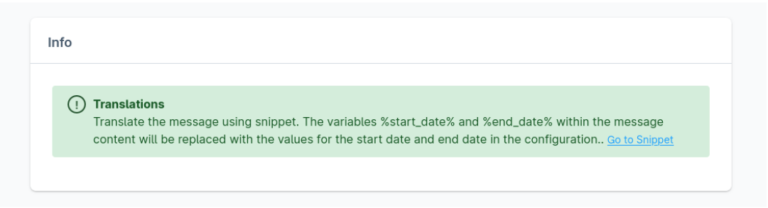
We can add snippets and styles to the custom components, and we need to import them to use in the plugin. We can add our messages to the twig file, import it as a template, and register it with the component. The styles we added in the SCSS file will be used in this template so we can show good-looking messages in plugin configurations. A template twig file is given below.
| 1 2 3 4 5 6 7 8 9 10 11 12 | <div class="alert alert-success"> <div style="display:flex"> <div class="alert-icon"> <span>!</span> </div> <div> <strong>{{$t(translations_info.translations')}}</strong> <p>{{$t(translations_info.note')}} <a href="javascript:;" @click="goToSnippetManager">{{$t(translations_info.link')}}</a></p> </div> </div> </div><span id="mce_marker" data-mce-type="bookmark" data-mce-fragment="1"></span> |
Now you need to build the administration using the administration build command to see the changes. The plugin configuration will look like the below screenshot . When clicked on the Go to snippet it will redirect to the edit page of the snippet “general.message” we added in the component snippets.
API test buttons
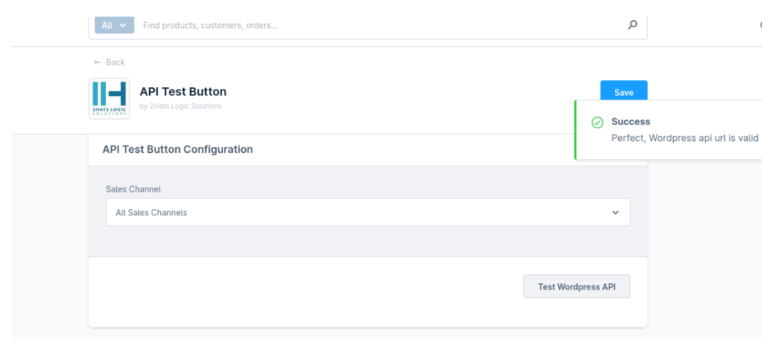
Using the custom components, we can add API test buttons in the plugin config. For that, in the config.xml file, add the below code.
| 1 2 3 | <component name="api-test-button"> <name>ApiTest</name> </component> <span id="mce_marker" data-mce-type="bookmark" data-mce-fragment="1"></span |
In the main.js file under /src/Resources/app/administration/src import our components folder.
import ‘.component/api-test’;
Inside side the component/api-test/api-test-button.html.twig add the template file like below
| 1 2 3 4 5 6 7 8 9 | <div style="display: block; margin-bottom: 20px;font-size:14px;text-align:right"> <sw-button-process :isLoading="isLoading" :processSuccess="isSaveSuccessful" @process-finish="saveFinish" @click="checkApi"> {{ $t('general.test_api') }} </sw-button-process> </div> |
We can use snippets here like the previous example.
Add below code to the index.js file under src/Resources/app/administration/src/component/api-test
| 1 2 3 4 5 6 7 8 9 10 11 12 13 14 15 16 17 18 19 20 21 22 23 24 25 26 27 28 29 30 31 32 33 34 35 36 37 38 39 40 41 42 43 44 45 46 47 48 49 50 51 52 53 54 55 56 57 58 59 60 61 62 63 64 65 66 67 | const { Component, Mixin } = Shopware; import template from './api-test-button.html.twig'; import deDE from '../snippet/de-DE'; import enGB from '../snippet/en-GB'; Component.register('wp-api-test-button', { template, mixins: [ Mixin.getByName('notification') ], snippets: { 'de-DE': deDE, 'en-GB': enGB }, data() { return { isLoading: false, isSaveSuccessful: false }; }, methods: { saveFinish() { this.isSaveSuccessful = false; }, checkApi() { this.isLoading = true; var postApiUrl = 'https://jsonplaceholder.typicode.com/posts'; //dummy API URL this.sendGetRequest(postApiUrl) .then(data => { if (data.length > 0) { this.createNotificationSuccess({ message: this.$tc('general.api_url_is_valid') }); } else { this.isLoading = false; this.createNotificationWarning({ message: this.$tc('general.api_url_is_not_valid') }); } }); }, sendGetRequest(url) { return fetch(url) .then(response => { if (!response.ok) { this.isLoading = false; this.createNotificationError({ message: this.$tc('general.api_url_is_not_valid') }); } else { return response.json(); } }) .catch(error => { this.isLoading = false; this.createNotificationError({ message: this.$tc('general.api_url_is_not_valid') }); }); } } }) |
Here, the SendGetRequest function will send the API requests and return the response. By checking the responses, we can show notifications using the functions createNotificationSuccess or createNotificationError. We need to build the administration using the administration build command to see the changes.


Related Articles