Greetings! I'm Aneesh Sreedharan, CEO of 2Hats Logic Solutions. At 2Hats Logic Solutions, we are dedicated to providing technical expertise and resolving your concerns in the world of technology. Our blog page serves as a resource where we share insights and experiences, offering valuable perspectives on your queries.
Docker is an open-source platform released in the year 2013, that makes it easier to deploy applications in a sandbox (called containers) to run on the host operating system. The use of containers has been escalated to the next level and it’s now become a part of the stack in most tech companies out there. This article focuses on how this platform can be useful from a web developer’s perspective.
Here’s an overview of some of the topics covered in this article:
- How does Docker help web developers?
- What is the difference between Docker and virtual machines?
- How to install it?
- Learn the bare essentials to get started with the technology.
- Create a simple PHP MySQL application with the same.
How does docker help web developers?
You develop your application in PHP 7.4 and MySql 8. Your teammate joins you in development. He has been working on a project which requires PHP 7.1 and MySQL 5.6. Now, when he installs the application on his local, he is greeted with some nasty errors. He needs to install the latest PHP and MySQL versions to start working on your team. If you were using Docker, your teammate would have been able to set up the application and get started in a couple of minutes without worrying about the various version inconsistencies.
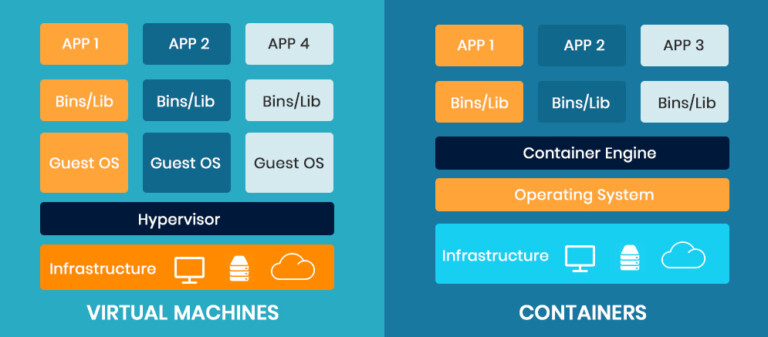
You could also use a virtual machine for this but it has a big disadvantage. Virtual machines consume more resources and higher disk spaces because there are many OS’s. Each VM is many GBs in size whereas containers are lightweight and usually in MB size.
Installing it is really easy if you are on Linux. You can use the convenience script mentioned on the installation page https://docs.docker.com/install/linux/docker-ce/ubuntu/#install-using-the-convenience-script. If you are on Windows, you need a Pro version to use it. You could register on http://hub.docker.com and login to https://labs.play-with-docker.com/ for playing around with docker commands. Installing on Mac is also pretty straight forward. https://docs.docker.com/docker-for-mac/install/
The most important parts of this technology are containers and images. An image is a template or a package used to create one or more containers. Containers are running instances of images in isolated environments. There are many publicly available images that you can use. For eg. nginx, php7.4, MySQL, etc. Developer and server team (if needed) work together to create a file with all the dependencies and libraries that are needed for the application to run. This file can be used to generate an image that can be used on any machine that has this platform installed.
Let’s try running some commands
The below command will pull the latest version of MySQL from hub.docker.com
[code lang=”bash”] docker pull mysql[/code]If you want a specific version, use that tag, for eg
[code lang=”bash”]docker pull mysql:5.7 [/code]If you try to do it run MySQL:5.7, it will show an error saying it needs some parameters. For more info, go to https://hub.docker.com/_/mysql
Let’s try to figure out how to run a MySQL container and connect to it using a GUI tool like Workbench or SqlYog. We will learn some commands along the way. Use the following command to run the container. If it already exists in your local, it will use that. It not, it will pull from its hub.
[code lang=”php”] docker run –name db-mysql -e MYSQL_ROOT_PASSWORD=1234 -d mysql:5.7–name specifies the name of the container
-e is the option to enter the environment variables
-d runs the container in detatched mode. If it runs in attached mode, it will keep the command line running[/code]
To view the running containers, use
[code lang=”php”]docker ps
[/code]
To view all containers including the ones that are stopped, append the -a parameter
[code lang=”php”]docker ps -a
[/code]To see all the details related to a running container, use the inspect command
[code lang=”php”]docker inspect db-mysql
[/code]You could also use the container id or the first 2 letters of the container id, for instance.
[code lang=”php”]docker inspect 67
[/code]If you scroll down to the bottom, you can see some useful information like its IP Address
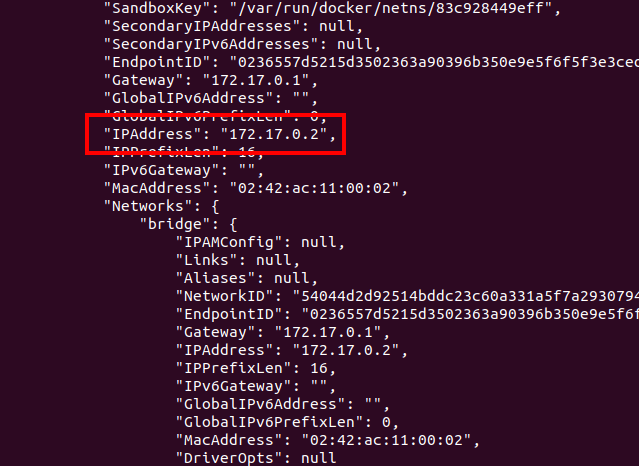
Now, you can use a GUI tool like Workbench or SqlYog to connect to the MySQL container with host: the IP listed above, username root and password 1234. We had used these credentials when starting the container.
Stop the container,
[code lang=”php”]docker stop 67
[/code]Now, you won’t be able to connect. To remove the container, use the rm command.
[code lang=”php”]docker rm 57
[/code]Next, we will create a simple PHP and MySQL application using Dockerfile.
1. Create your project folder and create an index.php file
[code lang=”php”]<?php
echo "Playing with docker";
?>
2. Create a Dockerfile with the following content in the same directory
[code lang=”php”]FROM php:7.2-apache
RUN docker-php-ext-install pdo pdo_mysql
COPY . /var/www/html/
The FROM command specifies the base image. Next, we install PDO to connect to the database. Then we copy all files in the directory to /var/www/html directory on its container.
3. Build the image using the following command
[code lang=”php”]docker build -t php-basic .
[/code]-t will tag the image with the name “php-basic”. The . represents the directory in which the Dockerfile resides.
Check the images in your host using the command
[code lang=”php”]docker images
[/code]
Now, let’s run a container based on the image
[code lang=”php”]docker run -d –name=php-basic -v /var/www/your-project-dir/:/var/www/html php-basic
[/code]-d runs the container in detached mode. If it is run without the -d option, it will just echo the text out in the console.
-v is used to persist the data. Otherwise, the changes we make to our index.php file won’t be added to the container. We will discuss volumes in the next blog.
Run inspect php-basic to get the IP. Go to the IP in your browser and see the text “Playing with docker”.
Next, let’s create another MySQL container and connect to it using Workbench
[code lang=”php”]docker run –name db-mysql -e MYSQL-ROOT-PASSWORD=1234 -d mysql:5.7
[/code]As before, get the IP using docker inspect DB-MySQL command and connect to the Db using any tool. I will use the Workbench.
The default database is “sys”, you could create a new one if you wish. Create a table called users and add some data to it.
[code lang=”sql”]CREATE TABLE sys.users ( id INT NOT NULL, PRIMARY KEY (id));
use sys;
insert into users(id) values(1),(2);
See the data we inserted when doing a simple select query.
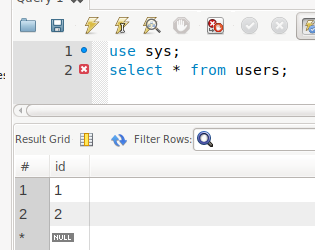
Now, let’s try to connect to this data and try to fetch the data using PHP. Update your index.php file like below. Replace the host IP with whatever your MySQL container IP is.
[code lang=”php”]$user = "root";
$pass = "1234";
$dbh = new PDO(‘mysql:host=172.17.0.3;dbname=sys’, $user, $pass);
// use the connection here
$sth = $dbh->query(‘SELECT * FROM users’);
echo "<pre>";
print_r($sth->fetchAll());
See the data retrieved from the database.
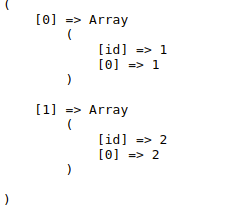
And yes, now you have a working PHP and MySQL set up in this platform. You can easily spin up a container with any version of PHP and MySQL in a matter of seconds! Keep experimenting.
You’ve seen the tip of the iceberg of this technology. Stay tuned for part 2 where I’ll share insights on how we can make a Laravel application with this. We will also be learning some key concepts like docker volumes, port mapping along the way. Stay tuned!!

Related Articles

